
Custom Luxury White Chocolate Packaging Boxes with Embossed Printing Lid and Bottom
|

Detailed Product Description
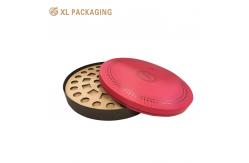
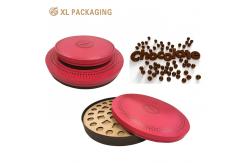
Custom Luxury Chocolate Sweet Candy Lid And Bottom Gift Cardboard Printing Chocolate Packaging Boxes
 Customizing a chocolate box involves combining creativity with personalization to suit the occasion, recipient, or brand. Here’s a step-by-step guide to help you design a unique and memorable chocolate box: 1. Define the Purpose and Theme Occasion: Is it for a birthday, wedding, holiday (e.g., Valentine’s Day, Christmas), or corporate gift? The theme should align with the event. Example: A romantic theme with hearts and soft colors for Valentine’s Day, or a minimalist design for a corporate gift. Recipient: Consider the recipient’s preferences (e.g., favorite colors, hobbies, or style). Brand Identity (for businesses): Incorporate logos, brand colors, or slogans to reinforce brand recognition.  2. Choose the Box Style and Material Box Types: Folding boxes: Simple, cost-effective, and easy to assemble (e.g., tuck-top or flip-top designs). Rigid boxes: Sturdy, luxurious, and reusable (ideal for premium chocolates). Specialty shapes: E.g., heart-shaped, round, or custom geometric designs for uniqueness. Materials: Cardboard (recyclable and affordable). Luxury papers (e.g., embossed, velvet, or metallic finishes for elegance). Eco-friendly options (e.g., recycled cardboard or biodegradable materials for sustainability). 3. Design the Exterior Color Scheme: Use contrasting colors to make the box eye-catching (e.g., dark chocolate brown with gold accents for luxury). For personalization, include the recipient’s favorite colors or match the event’s palette. Graphics and Imagery: Add illustrations, patterns, or photos (e.g., floral prints for a wedding, or playful motifs for a child’s birthday). For businesses, use high-quality product images (e.g., close-ups of chocolates) or brand-related visuals. Text and Typography: Include the recipient’s name, a message (e.g., “Happy Birthday!”), or a quote. Use elegant fonts for formal occasions and playful fonts for casual events. Ensure readability by contrasting text color with the background (e.g., white text on a dark background). 4. Add Personalized Details Embellishments: Ribbons or bows: Tie a silk ribbon around the box or add a bow for a classic touch. Charms or tags: Attach a small charm (e.g., a heart, star, or initial letter) or a handwritten tag. Embossing or debossing: Create texture with raised (embossed) or indented (debossed) designs (e.g., a logo or pattern). Foil stamping: Use gold, silver, or colorful foil to highlight text or graphics (ideal for luxury boxes). Interactive Elements: Add a pull-out drawer with a hidden message or a small surprise (e.g., a handwritten note). Include a QR code linked to a personalized video, playlist, or website.  5. Customize the Interior Insert Design: Use foam inserts, velvet-lined trays, or molded plastic to hold chocolates securely and prevent movement. Create compartments for different types of chocolates (e.g., truffles, bars, or bonbons). Lining Material: Use decorative paper, silk, or velvet to line the box and enhance luxury. Add a scented lining (e.g., vanilla or cocoa) for an immersive experience (ensure it’s food-safe). Greeting Card or Message: Place a small card inside with a handwritten note or printed message.  6. Select the Chocolates Fill the box with chocolates that match the theme or recipient’s tastes: Flavors: Include classics (milk, dark, white chocolate) or unique options (e.g., salted caramel, matcha, or chili-infused). Shapes and Decor: Use themed chocolates (e.g., heart-shaped for love, snowflakes for winter). Branding: For businesses, use custom-printed chocolates with logos or messages. 7. Final Touches and Packaging Seal the box: Use a sticker, wax seal, or branded tape to close it (add an extra layer of elegance). Outer packaging: Wrap the box in decorative paper or place it in a gift bag with tissue paper. Sustainability: If eco-friendly, highlight this with labels like “100% Recyclable” or “Plastic-Free.” 8. Production Options DIY Customization: Use craft supplies (colored paper, markers, stickers, or stamps) for a handmade touch. Ideal for small batches or personal gifts. Professional Printing: Work with a printing company to create custom boxes with high-quality finishes (e.g., UV coating, spot varnish). Provide a design file (e.g., PDF, AI, or EPS) and specify dimensions, materials, and quantities. Product Description
1:Our products are of various kinds and all of paper packaging can be customized. Customizing a chocolate box involves combining creativity with personalization to suit the occasion, recipient, or brand. Here’s a step-by-step guide to help you design a unique and memorable chocolate box: 1. Define the Purpose and Theme Occasion: Is it for a birthday, wedding, holiday (e.g., Valentine’s Day, Christmas), or corporate gift? The theme should align with the event. Example: A romantic theme with hearts and soft colors for Valentine’s Day, or a minimalist design for a corporate gift. Recipient: Consider the recipient’s preferences (e.g., favorite colors, hobbies, or style). Brand Identity (for businesses): Incorporate logos, brand colors, or slogans to reinforce brand recognition. 2. Choose the Box Style and Material Box Types: Folding boxes: Simple, cost-effective, and easy to assemble (e.g., tuck-top or flip-top designs). Rigid boxes: Sturdy, luxurious, and reusable (ideal for premium chocolates). Specialty shapes: E.g., heart-shaped, round, or custom geometric designs for uniqueness. Materials: Cardboard (recyclable and affordable). Luxury papers (e.g., embossed, velvet, or metallic finishes for elegance). Eco-friendly options (e.g., recycled cardboard or biodegradable materials for sustainability).  3. Design the Exterior Color Scheme: Use contrasting colors to make the box eye-catching (e.g., dark chocolate brown with gold accents for luxury). For personalization, include the recipient’s favorite colors or match the event’s palette. Graphics and Imagery: Add illustrations, patterns, or photos (e.g., floral prints for a wedding, or playful motifs for a child’s birthday). For businesses, use high-quality product images (e.g., close-ups of chocolates) or brand-related visuals. Text and Typography: Include the recipient’s name, a message (e.g., “Happy Birthday!”), or a quote. Use elegant fonts for formal occasions and playful fonts for casual events. Ensure readability by contrasting text color with the background (e.g., white text on a dark background). 4. Add Personalized Details Embellishments: Ribbons or bows: Tie a silk ribbon around the box or add a bow for a classic touch. Charms or tags: Attach a small charm (e.g., a heart, star, or initial letter) or a handwritten tag. Embossing or debossing: Create texture with raised (embossed) or indented (debossed) designs (e.g., a logo or pattern). Foil stamping: Use gold, silver, or colorful foil to highlight text or graphics (ideal for luxury boxes). Interactive Elements: Add a pull-out drawer with a hidden message or a small surprise (e.g., a handwritten note). Include a QR code linked to a personalized video, playlist, or website. 5. Customize the Interior Insert Design: Use foam inserts, velvet-lined trays, or molded plastic to hold chocolates securely and prevent movement. Create compartments for different types of chocolates (e.g., truffles, bars, or bonbons). Lining Material: Use decorative paper, silk, or velvet to line the box and enhance luxury. Add a scented lining (e.g., vanilla or cocoa) for an immersive experience (ensure it’s food-safe). Greeting Card or Message: Place a small card inside with a handwritten note or printed message. 6. Select the Chocolates Fill the box with chocolates that match the theme or recipient’s tastes: Flavors: Include classics (milk, dark, white chocolate) or unique options (e.g., salted caramel, matcha, or chili-infused). Shapes and Decor: Use themed chocolates (e.g., heart-shaped for love, snowflakes for winter). Branding: For businesses, use custom-printed chocolates with logos or messages.  7. Final Touches and Packaging Seal the box: Use a sticker, wax seal, or branded tape to close it (add an extra layer of elegance). Outer packaging: Wrap the box in decorative paper or place it in a gift bag with tissue paper. Sustainability: If eco-friendly, highlight this with labels like “100% Recyclable” or “Plastic-Free.” 8. Production Options DIY Customization: Use craft supplies (colored paper, markers, stickers, or stamps) for a handmade touch. Ideal for small batches or personal gifts. Professional Printing: Work with a printing company to create custom boxes with high-quality finishes (e.g., UV coating, spot varnish). Provide a design file (e.g., PDF, AI, or EPS) and specify dimensions, materials, and quantities.
|
||||||||||||||||||||||||||||||||||||||||||||||||||||||||||||||||||||||||||||||||||||||||||||||||||||||||||||||||
| Product Tags: Chocolate Packaging Boxes with Lid Embossed Printing Chocolate Packaging Boxes Luxury Chocolate Packaging Boxes | ||||||||||||||||||||||||||||||||||||||||||||||||||||||||||||||||||||||||||||||||||||||||||||||||||||||||||||||||


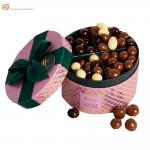
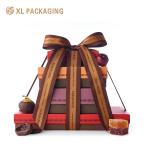
Related Products
|
XL Packaging Custom Packaging Factory Luxury Pink Cylinder Chocolate Box Rigid Paper Candy Macaron Top Bottom Tube Packaging With Ribbon |
|
Customized Print Gold Foil Stamping Chocolate Gift Boxes with Ribbon Bow for Holiday Gifts and Corporate Hampers |
|
|
CMYK/Pantone Printed Luxury Chocolate Boxes With Easy Open Design Embossed Logo And Anti-Tarnish Paper |
|
Custom Chocolate Boxes Packaging Durable Design for Chocolate Presents 1.5mm Thickness |
|
Custom Luxury White Chocolate Packaging Boxes with Embossed Printing Lid and Bottom |
|
Custom Printed Chocolate Paper Box Bakery Donuts Cookie Macaron Packaging Brown Lid And Base Box With Ribbon |
Email to this supplier