
Great Wall Snow Princess Inflatable Slip And Slide Rental
|
|
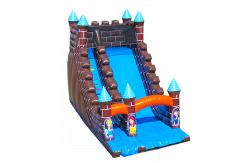
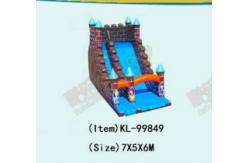
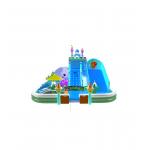
Inflatable Slides The picture shows an inflatable slide with a castle theme. The overall design of this inflatable slide mimics a medieval castle, with the main colors being brown and blue. On both sides of the slide are brown castle walls, and there are multiple pointed - top towers on the walls, with the tops of the towers being blue. The sliding part of the slide is blue, and there are orange arch structures on both sides of the slide, with Disney princess patterns on the arches. The bottom of the slide is a blue buffer area to ensure the safe landing of children. The entire inflatable slide appears to be very suitable for children to play, full of a fairy - tale - like dreamy atmosphere.
Specifications:
Workmanship Highlights: 1.Strengthening Weak Areas: We meticulously reinforce all areas
that are prone to weakness, including but not limited to welding
seams, internal baffles, and corners. This reinforcement strategy
is crucial in upholding the product's overall durability and
ensuring its structural integrity remains intact. It serves as a
preventive measure against potential damage and weakening during
operation, especially in demanding and high-stress scenarios.
FAQ Q: How to repair when damage? A: Step 1: Identify the Damage Thoroughly inspect the inflatable to locate any tears, punctures, or leaks. Step 2: Clean and Dry the Area Clean the damaged area with mild soap and water to remove dirt or debris. Allow the area to dry completely before proceeding with the repair.
Step 3: Patch the Damage Apply a patch specifically designed for inflatable repairs over the damaged area. Make sure the patch is slightly larger than the damaged area to ensure proper coverage. Press the patch firmly onto the surface, smoothing out any wrinkles or air bubbles.
Step 4: Apply Adhesive If using a patch that requires adhesive, apply a thin, even layer of adhesive to both the patch and the inflatable surface. Allow the adhesive to become tacky before pressing the patch onto the surface.
Step 5: Allow Time to Cure/Allow the Adhesive to Dry Once the patch is in place, you'll need to allow the adhesive to dry completely. This may take several hours, depending on the type of adhesive you are using. It's important to avoid using the inflatable until the adhesive is completely dry, as this could cause the patch to come loose. Wait at least 1 hour before inflating again.
Step 6: Test the Repair Once the patch has cured, inflate the inflatable and check for any signs of leakage. If the repair holds, the inflatable is ready to be used again.
It's important to use repair materials specifically designed for inflatables and follow the manufacturer's instructions carefully to ensure a successful repair. If the damage is extensive or beyond your ability to repair, consider seeking professional assistance.
- Q: Accessories included? A: Free accessories include Storage Bag / Repair Kit / Warning Label / Custom Logo . |
||||||||||||||||||||||||||||||||
| Product Tags: castle theme Inflatable Slides children Inflatable Slides |
|
Children Fun Park Inflatable Giraffe Animals Slide For Rentals |
|
Children Fun Park Inflatable Giraffe Animals Slide For Rentals |
|
Children Fun Park Inflatable Giraffe Animals Slide For Rentals |
|
Children Fun Park Inflatable Giraffe Animals Slide For Rentals |
|
Children Fun Park Inflatable Giraffe Animals Slide For Rentals |
|
Children Fun Park Inflatable Giraffe Animals Slide For Rentals |