China OLED Display Module manufacturer
Shenzhen Saef Technology Ltd.
Innovation for Life
4
Home > Products > HDMI TFT LCD Display >

CTP 4.3 Inch HDMI Raspberry Pi Dsi Display 800x480 Full Viewing Angle

CTP 4.3 Inch HDMI Raspberry Pi Dsi Display 800x480 Full Viewing Angle

Brand Name SAEF
Model Number SFHDMI430H-800480A-CT
Certification ISO9001 / ISO14000
Place of Origin ShenZhen / China
Minimum Order Quantity 3 pcs
Price Negotiable based on order lot quantity
Payment Terms L/C, , T/T, Western Union
Supply Ability 3000K pcs per month
Delivery Time 3-5 weeks
Packaging Details Standard Exportation Package
Keywords 4.3"DSI HDMI Display
Resolution 800x480 pixels
Support HDMI1.3、HDMI1.4、HDCP1.4、HDCP2.2
Compatible with Raspberry Pi、BB Black、Banana Pi
CTP Interface USB to IIC
Surface Luminance 300 cd/m2 - 1000 cd/m2
Touch screen CTP( Capacitive Touch Screen)
LED lifetime 40,000 hours
Operating Temp. –20℃ to +70℃
Compliance REACH & RoHS Compliant
Detailed Product Description

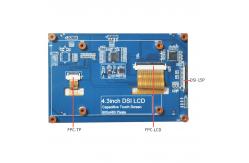
4.3 inch DSI, 4.3 inch HDMI Display Product features


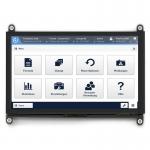
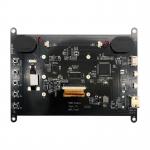
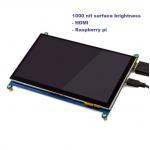
SFHDMI430H-800480A-CT is a HDMI TFT LCD module which integrated TFT LCD, PCAP touch and driving board.


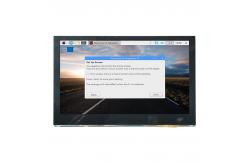
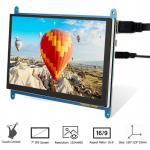
1. 4.3 inch IPS screen, hardware resolution of 800×480 dots resolution. 
2. Capacitive 5-point touch control.
3. Tempered glass capacitive touch panel, hardness of >=6H.
4. Support Pi 4B/3B+/3A+/3B/2B/B+/A+, CM3/3+/4 requires the optional adapter DSI-Cable-15cm.
5. Drive the LCD directly through the Raspberry Pi's DSI interface with refresh rates up to 60Hz.
6. When used with Raspberry Pi, Raspberry Pi OS / Ubuntu / Kali and Retropie are supported, drive-free.
7. Support for controlling backlight brightness through software.


Hardware connections


Using an FFC cable, connect the 4.3inch DSI LCD to the Raspberry Pi's DSI connector.
2. For ease of use, you can screw the back of the 4.3inch DSI LCD of the Raspberry Pi and assemble the copper pillars.
As shown in the following figure:


Software connections


Raspberry Pi OS/Ubuntu/Kali and Retropie systems for Raspberry Pi.
1. Please download the latest version of the image from the Raspberry Pi official website. Download the compressed file to your PC and extract the .img file.
2. Connect the TF card to the PC and format the TF card using SDFormatter software.
3. Open the Win32DiskImager software, select the system image prepared in step 1, and click write to flash the system image.
4. After flashing, save and safely eject the TF card. And insert the TF card into the Raspberry Pi.
5. Power on the Raspberry Pi, wait normally for a few seconds to display normally. After the system starts, it can be touched normally.
Note: On December 2, 2021, the Raspberry Pi's Raspberry Pi OS split into two branches, the Buster branch and the Bullseye branch.
The Buster branch is a continuation of the old system and is more stable. The Bullseye branch has added new features, using open source libraries and new interfaces. The current Bullseye branch has just been released and is not yet stable.
If you are an industrial user, the Buster branch is highly recommended.
If you are using a system with a Buster branch, the image will work without any changes. If you are using a system that branches of Bullseye, the following modifications will also be required.
Comment the following statement in the config .txt file (the config file is located in the TF card root directory, i.e. /boot):


#camera_auto_detect=1
#dtoverlay=vc4-kms-v3d

Add the following statement below [all]:

dtoverlay=vc4-fkms-v3d
start_x=1

Restart the Raspberry Pi after saving

sudo reboot

If you need to use a CSI camera under the system of the Bullseye branch. Since this branch uses the libcamera camera library by default, this library does not support FKMS drivers.
So in addition to the above modifications, you also need to install the Rappicam camera library.
Here's how to install it:
Run the following command in the terminal:


cd ~
sudo apt install cmake
cd userland
./buildme
sudo cp build/bin/* /bin/

After that, execute the following command to shut down:

poweroff

Connect the Raspberry Pi camera to the CSI interface of the Raspberry Pi, power on the Raspberry Pi again, and after the system boots, execute the following command:
photograph

raspistill -o image.jpg

Camera

raspivid -o video.h264 -t 10000


4.3 inch DSI, 4.3 inch HDMI Display Product Image

HDMI interface pin definition

1T.M.D.S DATA2+
2T.M.D.S DATA2 Shielded
3T.M.D.S DATA2-
4T.M.D.S DATA1+
5T.M.D.S DATA1 Shielded
6T.M.D.S DATA1-
7T.M.D.S DATA0+
8T.M.D.S DATA0 Shielded
9T.M.D.S DATA0-
10T.M.D.S DATA CLOCK+
11T.M.D.S DATA CLOCK Shielded
12T.M.D.S DATA CLOCK-
13CEC (Consumer Electronics Control Optional)
14Reserved (in cable but N.C. on device)
15SCL(DDC)
16SDA(DDC)
17DDC/CEC Ground
18+5V (power supply)
19Hot swap probe cable


Product Tags: 300cd/m2 Raspberry Pi Dsi Display   800x480 Raspberry Pi Dsi Display   CTP Raspberry Pi 4 Dsi Display  
Related Products
Email to this supplier
 
From:
Enter your Email please.
To: Shenzhen Saef Technology Ltd.
Subject:
Message:
Characters Remaining: (80/3000)