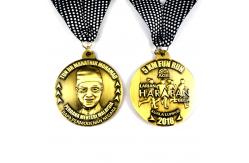
Both Sides With Design Custom Race Medal For Running MarathonCustomizing a race medal with design on both sides involves several
key steps. Begin by conceptualizing your design for both the front
and back. The front should feature a dynamic central theme, like a
runner or event logo, with space for the event name and date. The
back should include an area for personalization, such as engraving
the participant's name and finishing time, with decorative elements
like a laurel wreath to enhance the design. Choose appropriate
materials and finishes, such as polished brass or enamel accents,
to complement your design. Collaborate with a designer to create
high-resolution artwork and review proofs carefully before
approving production. Ensure the final product meets quality
standards and accurately represents your vision. Custom Option | Available Options | | Material | Zinc Alloy / Brass, Iron / Wooden / Acrylic / Dual Material | | Type | One Side with Design / Both Sides with Design / Three-dimensional
Multilateral Design | | Style | Soft Enamel / Hard Enamel / Translucent Enamel / Paper Sticker /
Die Struck / Offset Printing / Offset Printing with Epoxy Coating /
Soft Enamel with Epoxy Coating / Soft Enamel with Glitter / Soft
Enamel with Glowing / Soft Enamel with Printing | | Medal Material Color/Finish | Shiny Gold / Shiny Silver / Shiny Copper / Shiny Rose Gold / Shiny
Brass / Black Nickel / Satin Gold / Satin Silver / Satin Copper /
Satin Brass / Satin Black Nickel / Antique Gold / Antique Silver /
Antique Brass / Antique Copper / Spray Gold / Spray Silver /
Brushed Brass / Dual Plating | | Material Colors | Single Metal Color / Two Metal Colors | | Number of Colors in Design | No Color / 1-5 Colors / 6-8 Colors / 9-10 Colors / 11-13 Colors /
14-15 Colors / 16-17 Colors / 18-20 Colors / 21+ Colors / Unlimited
Colors-Printed Design | | Medal Ribbon Width | 0.75 / 1 / 1.25 / 1.5 / 1.75 Inches | | Medal Ribbon Length | 14.5 / 15 / 15.5 / 16 / 16.5 / 17 / 18 Inches | | Medal Ribbon Loop Type | Round Shape / Arc Shape / Semi-closed Shape / Wide Shape – Custom
Fit / Wide Shape – Large / Built-in Ribbon Holes / Back Shape /
Custom Shape | | Engraving | Sequential Names / Sequential Numbers / Custom Words | | Packaging and Branding | Clear Poly Bag / Velvet Pouch / Velvet Box / Arcylic Box /
Suspension Box / Wooden Box / Hard Paper Box |
How to Customizing a Both-Side Design Race MedalCustomizing a race medal with a design on both sides allows you to
create a truly unique and meaningful award. Here's a step-by-step
guide to the process: 1. Conceptualize Your DesignFront Side Design: Start by defining the central theme of the medal. Consider
incorporating elements that represent the event, such as a stylized
figure of a runner, event logo, or specific imagery related to the
race. Choose a dynamic design that captures the spirit of
competition and achievement. Decide on the placement of key
elements, such as the event name, date, and location. Back Side Design: Plan for personalization options on the reverse side. This area
is often reserved for engraving the participant’s name, finishing
time, or other significant details. Add symbolic elements like a
laurel wreath or a thematic emblem to enhance the design and
celebrate the athlete’s accomplishment. Ensure that the space
allocated for engraving is clear and adequately sized.
2. Select Materials and FinishesMaterial: Choose from a range of materials such as brass, zinc alloy, or
stainless steel, depending on your budget and desired quality. Each
material offers different finishes and durability, so select one
that complements your design and the medal’s intended use. Finishes: Opt for finishes that enhance the medal's visual appeal. Options
include polished, matte, or antique finishes. You may also consider
adding enamel or color accents to make certain design elements
stand out.
3. Design LayoutFront Side: Ensure that the design elements are well-balanced and
harmoniously placed. High-resolution artwork or digital mock-ups
will help visualize the final product. Include space for necessary
text, such as the event name and date, ensuring it is legible and
aesthetically integrated. Back Side: Design the engraving area to be both functional and attractive.
Include a clear area for personalization and consider decorative
borders or motifs to complement the front design. Ensure that the
engraving area is easily accessible for customization without
disrupting the overall design.
4. Work with a Designer- Collaborate with a professional designer or design team to bring
your vision to life. Provide them with your concept, preferred
elements, and any specific requirements. Their expertise will
ensure that the design is both visually appealing and feasible for
production.
5. Proof and ApproveReview Proofs: Once the design is finalized, review digital proofs or prototypes
provided by the manufacturer. Check for accuracy in design
elements, text placement, and overall appearance. Make any
necessary adjustments before giving final approval. Approval: Confirm that all design elements, including personalization
options, meet your expectations. Ensure that the design is
correctly represented and that there are no errors before
proceeding with the full production run.
6. ProductionManufacturing: Once approved, the medal design will be produced according to
your specifications. The process may include stamping, casting,
engraving, and finishing. Work closely with the manufacturer to
ensure the highest quality and adherence to your design. Quality Control: Perform a quality check on the finished medals to ensure they
meet your standards and accurately reflect the approved design.
Address any issues promptly with the manufacturer.
By following these steps, you can create a custom race medal that
celebrates achievements in a personalized and memorable way, with a
thoughtfully designed front and back that captures the essence of
the event and honors the participants. |