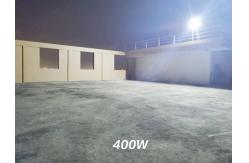
Outdoor 400watt Smart LED Panel Solar Power Street Light with
Remote
| Power | Solar Panel | Solar Cell | Battery | Lamp Source | Lamp Size/mm | Smart Mode |
| 100w | 5V/25w | 430*350mm | 3.2V/18000mAH | 192pcs 2835SMD LED | 520*260*80 | remote controller+light sensor |
| 200w | 5V/35w | 580*350mm | 3.2V/30000mAH | 192pcs 2835SMD LED | 520*260*80 | remote controller+light sensor |
| 300w | 5V/40w | 630*350mm | 3.2V/36000mAH | 300pcs 2835SMD LED | 600*300*80 | remote controller+light sensor |
| 400w | 5V/50w | 670*445mm | 3.2V/48000mAH | 300pcs 2835SMD LED | 600*300*80 | remote controller+light sensor |
Installation steps of split solar street light:
1. Select an installation location
Location selection: Make sure the solar panels can receive
sufficient sunlight and avoid obstructions (such as large trees,
buildings, etc.) around them.
Height selection: The installation height of the light pole is
generally 4-6 meters to ensure the lighting effect of the road.
Ground foundation: Make sure that the ground in the installation
location is firm and flat, suitable for installing light poles.
2. Fix the light pole
Preparation: Dig a pit of a suitable depth, usually 1/3 or 1/4 of
the length of the pole.
Pouring the foundation: Fill the bottom of the pit with concrete
and wait for it to cure. Secure the pole bracket to ensure that the
pole is vertical and stable.
Install the light pole: Insert the light pole into the concrete
foundation and bolt it. Check the verticality of the pole to make
sure it is not tilted.
3. Install solar panels
- Location: The panels are usually mounted on the top of a pole or on
a bracket to ensure maximum sunlight reception.
- Fixed the solar panel: Fix the solar panel on the top of the pole
or a suitable bracket according to the bracket and screws that the
lamp supports. Make sure the panels are parallel to the ground, or
slightly angled, for the best angle of light.
- Connect the panels: Using a suitable cable, connect the solar
panels with the controller. The positive and negative poles of the
battery board should be properly connected with the controller.
4. Install the battery and controller
- Install the battery: Place the battery at the bottom of the
light pole or in a dedicated battery compartment to ensure that the
battery is waterproof and well ventilated.
- Connect the battery: According to the positive and negative poles
of the battery, connect to the controller correctly. Make sure the
wiring is secure and avoid short circuits or poor contacts.
- Install the controller: The controller is usually installed on the
upper part of the light pole or close to the battery to ensure that
its battery management and charging functions are working properly.
5. Install LED fixtures
- Fixed fixtures: Depending on the design of the fixture, fix the LED
fixture on the top of the pole or in a preset position.
- Connect the power cable: Connect the power cord of the LED light
with the solar controller to ensure a secure connection and avoid
poor contact.
- Adjust the angle of the fixture: Adjust the illumination
angle of the luminaire as needed to ensure that the lighting range
covers the desired area.
6. Check the electrical connections
Make sure all cables are securely connected and that the
connections between batteries, controllers, and fixtures are
correct.
Check the electrical wiring between the solar panel and the
controller and the light fixture to ensure that the positive and
negative poles are connected correctly.
7. Debugging and testing
- Boot test: On a sunny day, turn on the system for testing to check
whether the solar panel is charging normally and whether the lamp
is on normally.
- Adjust the brightness: Adjust the brightness and illumination angle
of the LED light as needed.
- Check the control system: Confirm that the controller can
automatically turn the light on and off according to the light. At
night or when the light is low, the street lights should turn on
automatically.